In this post, we’ll show you a few things to do before the Windows 10 update. Some of these are simple safeguards that everyone should do. Others are more conservative measures that might only be worth your time if your Windows 10 PC is mission-critical. In this guide, we’ll walk through: backing up your data, creating recovery media, and disabling software and hardware that might interfere with the upgrade. Use this guide to reference what you need to do to make sure the Windows 10 update goes off without a hitch.
Before You Begin: Am I Eligible to Upgrade?
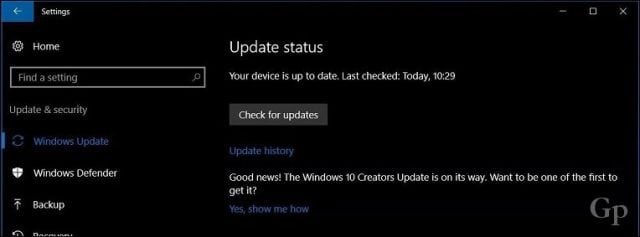
The latest cumulative update for Windows 10 now advertises the Windows 10 update to users who might be interested in becoming early adopters. In Settings > Update & security > Windows Update, you’ll see a message that says, “Good news! The Windows 10 Spring Creators Update is on its way. Want to be one of the first to get it?” If you are excited to be among the first, follow the “Yes, show me how” link to join the upgrade. If you don’t see the link, make sure you have the latest public updates installed already.
Check out our guide: How to Install Windows 10 1803 (Spring Creators Update) Using Windows Update.
1. Check Manufacturer’s Website to Find Out if Your System is Compatible
Manufacturers of various brands actually do a good job of maintaining a list of compatible systems with specific versions of Windows 10. Check the following links to see if the Creators Update supports your system. If an OEM indicates a particular model is not compatible with Windows 10 1803, it is possible you could still install the update using the clean install method. Of course, the best way to do this is to ensure you have a good backup plan. Windows 10 has included a rollback feature since the first release, but it’s not perfect, so that I wouldn’t count on it too much.
ToshibaPanasonicPackard BellASUSFujitsuHewlett Packard (HP)/CompaqDell IncLenovoAcerSamsungSony VaioGIGABYTEMSIASROCKBIOSTARGateway
2. Download and Create Backup Reinstall Media for Your Current Version of Windows
You don’t want to burn your bridges while trying to upgrade to the latest Windows 10 Feature Update. It’s pretty much a sure bet that Microsoft releases the new version on the day they will remove the previous version of Windows 10 from the Media Creation Tool. That means you won’t be able to download the older Windows 10 release anymore or earlier versions, such as 1511 or 1507 if you need to go back. It turns out, some systems, while compatible with a particular version of Windows 10, might not work with the latest release. Reference our comprehensive guides for backing up your system before initiating the installation. If it’s still before the latest Windows 10 Feature Update is launched, you can use the Media Creation Tool now to download a backup copy of the Anniversary Update, Creators Update ISO, or you can update your recovery drive, which will create a bootable copy of the version you currently have installed, which you can use for reinstallation.
3. Make Sure Your System Has Enough Disk Space
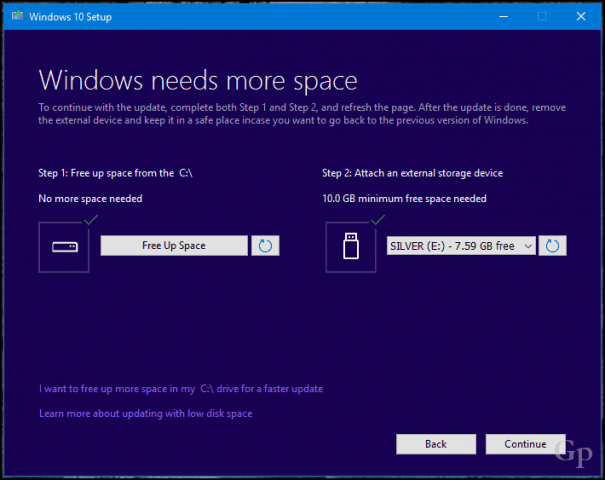
Windows 10 requires a minimum of 10 GB of free space; to be safe, the bare minimum I would recommend is 16 GBs. Recent Windows 10 Feature Updates setup is more sensitive to disk space challenges. Now would be a good time to invest in a USB thumb drive or external hard disk with a minimum of 16 GB of free space. Setup can use such storage devices to help facilitate the upgrade, just in case. You can also run the routine clean-up chores, such as Windows 10’s built-in storage clean-up tools and the good old disk cleanup wizard. If you still can’t make a dent in cleaning up enough space for the upgrade, check out our tutorial for Jam Software’s TreeSize, a free utility that makes it easy to find those stubborn large files.
4. Connect to a UPS, Ensure Battery is Charged, and PC is Plugged In
The Windows 10 Feature Update would download in 25 minutes in a perfect world, then install within 10 to 15 minutes. This might be the case for many users, but it won’t be smooth sailing for other users. While Microsoft has made significant progress in reducing the size of Windows updates, the new version of Windows 10 will be a large update. That’s just the Windows update part—the installation is the most complex sequence of setup. Windows 10 will have to decompress files, move around key operating system files and personal files, and reconfigure everything to work with your hardware. Essentially, Windows gives you a clean installation of the new operating system without disrupting your configuration or personal data. It’s a delicate balancing act that can actually extend the time it takes to complete the upgrade. So, make sure your laptop’s battery is working and charged up, and if you are upgrading a desktop, connect it to a UPS. There’s nothing more disastrous than an interrupted Windows update.
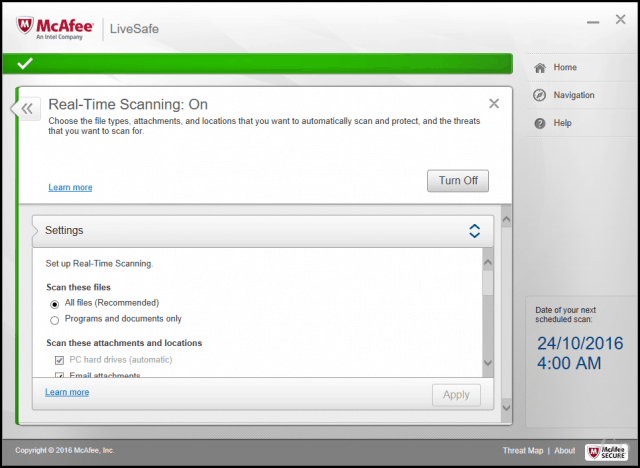
5. Disable Your Antivirus Utility – In fact, uninstall it…
Trust me on this one. Contrary to what industry experts might say, security software remains one of the most common causes of issues during major operating system upgrades. After all, it’s doing what it’s supposed to do: blocking changes to your system configuration. Antivirus software will sometimes detect and assume an unexpected update; making a major modification to system files might be an attack in progress. The same goes for software such as your firewall. To avoid false positives, Microsoft usually recommends updating the antivirus software before upgrading; you could try your luck and see if it works. If it doesn’t, then you likely know the reason why. Below are some links to instructions on how to disable popular security utilities. After the upgrade is complete, you can always reinstall your antivirus utility.
Norton – right-click Norton in the Notification Area, then click Disable Antivirus.McAfeeESET NOD32KasperskyAvastAVGTrend MicroBitdefenderWebroot Secure AnywhereF-SecurePandaComodo
6. Disable All Background Software
Startup programs can also interfere with setup; disabling them by performing a clean boot can help.
7. Disable Peripherals and External USB Devices
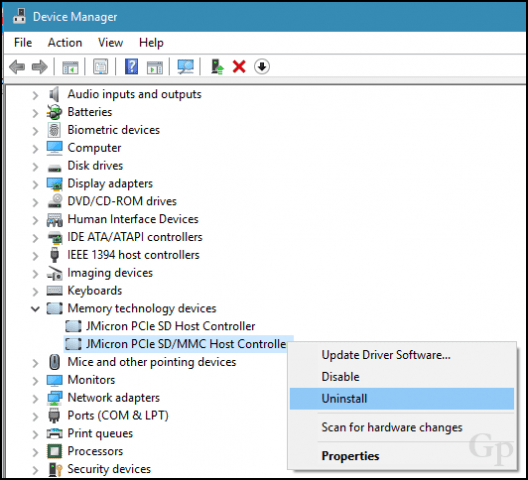
It turns out devices such as your smart card reader can confuse setup. This is especially the case if you are performing an offline upgrade using USB media. Common USB storage devices such as external hard disks can also confuse setup, so disconnect them if you have those attached. The same goes for peripherals such as your printer and scanner. The best recommendation is to have a simple configuration, no more than a keyboard and mouse. If you have an SD card reader, eject your media before upgrading. You can also uninstall your SD card reader as an extra measure. Press Windows key + X > Device Manager > Memory technology devices. Right-click SD Controllers, then click uninstall. If there is more than one, right-click each, then click Uninstall.
8. Update or Disable Display Adapters
Some installations call for more advanced preparation. Your display adapter can actually be an upgrade blocker, too. This commonly occurs when you see a black screen during the installation then the setup automatically rolls back. Uninstalling your video card driver is known to help. Also, if you have multiple displays connected, only keep one attached for the duration of the installation. In some cases, updating the video card driver to the latest version can help too. To uninstall a video card driver, press Windows key + X > Device Manager > Display Adapters and Right-click your video card driver, then click uninstall.
9. Disconnect from the Internet When Using an ISO
If you plan on using the ISO media to upgrade, disconnect from the Internet during setup. There are multiple ways to do this: you can disconnect the Ethernet cable manually. If you are connected to a wireless network, you can manually disable Wi-Fi by turning off the Wireless switch on your laptop. An easier way to do it is to open Action Center (press Windows key + A), then click Airplane Mode. This will disable all network technologies. Proceed with the upgrade. If you update through Windows Update when the download reaches 100% disconnect from the Internet LAN (Ethernet) or Wi-Fi, then proceed with the installation.
10. Skip “Get Important Updates”
Over the past few releases of Windows 10, the upgrade wizard can take its own sweet time to start if you choose the option to Get important updates. I recommend you choose Not right now. If you choose it and the setup appears to be taking ridiculously long to move past this stage, close the setup wizard and restart your machine.
11. Switch to a Local User Account
Computers connected to a Windows Server Domain should either switch to a local user account on the machine or leave the domain before attempting setup. See the section of the following article, Leave a Domain: How to Join a Windows 10 PC to a Domain – groovyPost
12. Run these Commands to Resolve Any System Integrity Issues
The Deployment Image Servicing and Management (DISM) command is a handy diagnostic tool for resolving file integrity issues that might prevent a successful install. Users can run the following commands as part of their prep routine before initiating the upgrade. Press Windows key + X, click Command Prompt (Admin), type each command, then hit Enter on your keyboard. Dism /Online /Cleanup-Image /CheckHealth Dism /Online /Cleanup-Image /ScanHealth Dism /Online /Cleanup-Image /RestoreHealth Another command you should run is the cleanup driver. Press Windows key + X, click Command Prompt (Admin), then type the following command and hit Enter on your keyboard. Restart your computer when complete. This should help with the notorious failed or non-responsive installation during the driver migration. rundll32.exe pnpclean.dll,RunDLL_PnpClean /DRIVERS /MAXCLEAN
Conclusion
The point of this guide isn’t to scare you into avoiding a Windows 10 Creators Update upgrade. For most users, the upgrade can and will be successful without performing any of the steps above. But for those who seem to have bad luck or can’t afford a failed upgrade, knowing common causes of upgrade issues can save you a lot of time and hassle. With each new Windows revision, there will always be the unexpected, and it will be a learning experience in the process. You can check out our handy Windows 10 article for more details about resolving some of the common install errors users are likely to encounter. Our vibrant Windows 10 forum is also a great resource for finding solutions too. Have you upgraded to the latest Windows 10 Feature Update? How did it go? Let us know in the comments. Install fresh, which OS of your choosing, windows or linux onto the small partition 80GB is more than enough. If you are lucky and have 2 hdds, then install to smaller one. when installed, add the second drive that has all your data. This method works 99% of the time without a hitch. Clean start install programs as and when needed. Keeping your system lean, I just wondered if the new version update thru Windows Update (1 1/2 months since the supposedly update was released on April 11, 2017) will get here before the next update release due in Sep/Oct 2017. I tried the new update version about 2 weeks after the release date and had nothing but problems like the ones reported here(BSOD, computer crashes, some programs not working properly). As big as Microsoft is and as long as they been in this business, they should review and test these new OS versions a lot longer that trying to put them out every 6 months. This is one good example of a rush to put out a new version that resulted in a huge number of problems. I’ll wait until it comes through the automatic update system, then try the suggestions here. May someone kindly explain to me what needs to be done and recommend a site where the required software can be obtained. I ran the installation cd and received an error message: LifeCam doesn’t work on this version of windows.. It is a shame that a fully functional webcam device has become useless. VERY frustrated! Thanks for visiting my blog. Providing extensive tech support in the comments section just isn’t possible for our small writing staff. If you need help, please use our new Windows 10 help forum which we’ve created for this purpose. Thanks! -Steve groovyPost.com As mentioned earlier, I have a HP Envy 15 laptop that is no longer supported by HP and is not compatible with the Creator’s upgrade for Windows 10 although it runs the Anniversary version just fine. In my case, I originally thought the system overheated during the upgrade but then after baby sitting another second attempt I saw that the system crashes on the first reboot after the upgrade is 25% installed. My BIOS screen flashes 2 times and then the system crashes and I get an error saying hardware is missing and my system needs to be repaired. I tried calling Microsoft support twice and got nowhere, they refuse to provide support for any system that is not compatible. Even to the point where they cannot tell you how to stop the forced upgrade from Windows Update now that that is happening. I finally got them to escalate my issue to Level 2 support and when they called back 2 days later they confirmed that the solution that I had found was in deed the correct solution on how to stop the upgrade. I just wish they would instruct the first level support people on how to provide this information. So here’s the solution.. you have to download the Windows Update Show-Hide tool (wushowhide.diagcab) then the trick is to let Microsoft download the Creator’s upgrade to your machine and then run this tool BEFORE the Windows Update service catches the download and sets up to install it, typically over night. When you run the tool you can then HIDE the upgrade and it will NOT be installed by Windows Update until whenever you unhide the upgrade if you ever deem necessary. This is the fix that was confirmed by Microsoft Level 2 support. Hope that helps. I have set the Wi-Fi and Ethernet connections as metered for it not to upgrade. Based on all my readings regarding 1703, I will simply leave it the way it iis for a while. After downloading the Media Creation Tool and before installing Version 1703, disconnect from the internet(either disconnect the Ethernet cable or disable your WiFi). After the installation is complete, reconnect the Ethernet cable or enable your WiFi, then check for updates. My point is that Microsoft’s default behaviour is that after every failed installed through Windows Update, it will start downloading all the files again; and again and again. Over the last 4 days (when I was upgrading 5 computers at home), downloaded data exceeded our average by 40GB. Because of the plan I have it was not a big deal, but it is ridiculous. This can be easily avoided, by just checking the download already in the computer, but that seems to be too complicated for MS. I have tried different ways to download these major updates. I found, if you have more that 1 computer to update, do 1 at a time and let it completely update. After waiting 3 1/2 months for the update for 2 of my computers, I just downloaded the Media Creation Tool, saved it as an ISO file to my PC and created an USB drive for my other computer. When I started to install the update, I disconnected the Ethernet cable or disabled the WiFi so as not to be connected to the internet while installing the update. After the update was installed, then I connected the Ethernet cable or enabled the WiFi to connect to the internet to check for updates. This way worked best for me. Had no problems doing it this way. Hope I don’t have to wait another 3 1/2 months for the next major update, “The Fall Creators Update” due out on October 17. Just might have to do it again the way I did my last 2 computers. Just have to wait and see what happens and hope for the best. Thanks, Microsoft! If anyone has any ideas about this issue and wants to share them, they’re welcome. Like many people, I have gone along with Microsoft’s conversion of my Windows 7 O/S, which i paid them for, to their so called free “windows as a service” Win 10 program. Well, the service seems to stop at update 1703 with my particular computer. (The suggestion by Linux fans to change over is of no use to someone like me who owns windows software which i already know does not work on Linux.) I hope that since my computer seems to have at last realised it is not supported for 1803, it will just get on with its job. Quaintly, Windows Update tells me it is up to date, even though the Update History says i have failed many times to install 1803. I don’t take it personally. I know that to Microsoft, as with Google and Facebook, the co-owners of the Internet, i am just a blip. However I will continue to express defiance against the barbarians at my electronic gate by refusing to have a Microsoft account, downloading nothing from Microsoft Store or Google playstore, and running assorted blockers on my browser. This will not change the world, but it’s sort of fun. Comment Name * Email *
Δ Save my name and email and send me emails as new comments are made to this post.


![]()
