OEM’s maintain databases determining support for a particular release of Windows 10. That said, Windows Update, Media Creation Tool, and the Upgrade Assistant don’t reference any of these services. If you discover your system isn’t compatible with a new Windows 10 Feature Update, here is how you can block it from installing.
How to Block New Versions of Windows 10 from Automatically Installing
The Windows 10 setup process doesn’t inform users whether their computer is supported or not. Before you install a Feature Update, the first thing you should do is check the hardware vendor’s website to determine if your system is compatible. Here are some links to popular brands where you can check support status for your make and model. This can be the first step to ensure you don’t update your system to find out later in frustration you have to roll back or perform a clean install.
Acer ASUSDell IncFujitsuHewlett Packard (HP)LenovoPackard BellPanasonicSamsungSony VaioToshiba
Through Windows Update
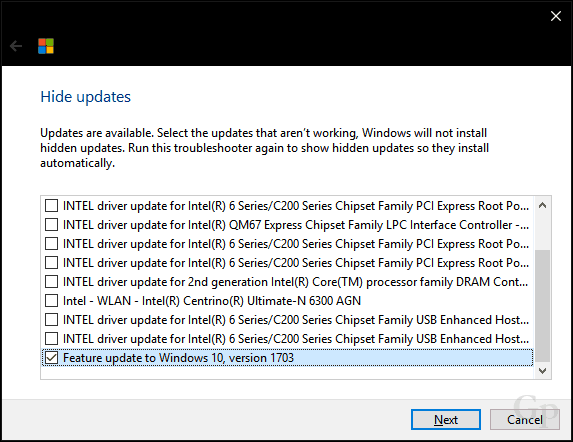
The most common way many users install a new Feature Update is through Windows Update. But how do you prevent it from installing? Microsoft’s Show or Hide Updates tool can be a first-line option. This small wizard lets you choose to hide the Feature Update in Windows Update. After downloading, launch it, click Next, wait while it detects pending Windows Updates.
Click the Hide Updates menu.
Scroll through the list, then select the Feature Update. In my case, I am hiding Windows 10 Creators Update, version 1703. Check the box next to the update, then click Next to confirm changes. When future versions are released in the fall and spring, you will see either 1709 or 1803.
Temporary Block
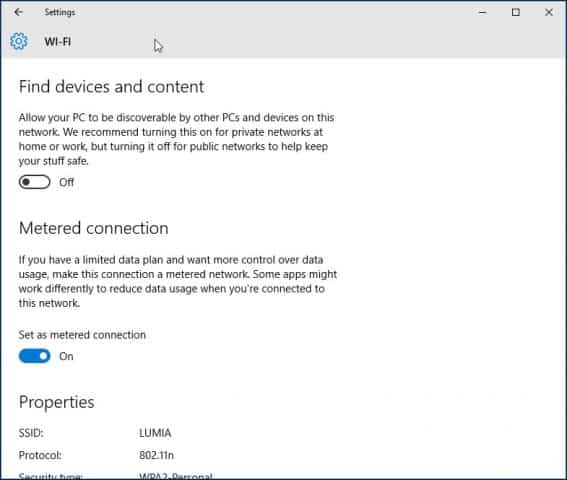
The next option is not practical but can temporarily block a feature update too. You can set your network up as a metered connection, which prevents large updates from downloading. Open Start > Settings > Network & Internet > Wi-Fi, click your network connection, then toggle on Metered Connection. You can also do this for wired connections in Windows 10 version 1703 or later.
Pause the Updates
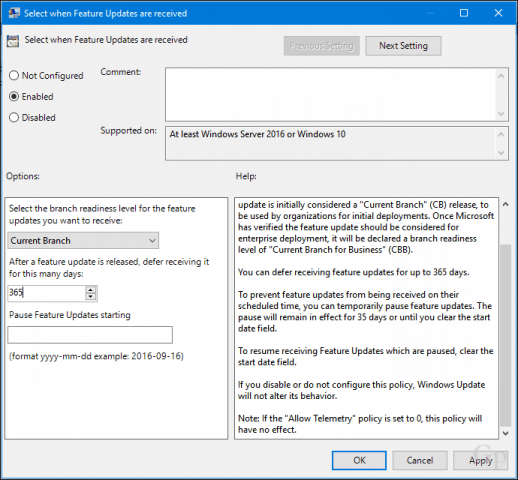
All Windows editions let you pause an update for up to 35 days. Users running premium business editions such as Windows 10 Pro, Pro Edu, Enterprise, Education, and Pro for Workstation have additional options. Using the Group Policy editor, you can defer feature updates for even longer. If you are running any of those editions, here is how you do that. Press Windows key + R, type: gpedit.msc then hit Enter. Under Computer Configuration, expand Windows Components > Windows Updates > Defer Updates, then double click Select when Feature Updates are received.
Block Updates for a Full Year
You can block a feature update for up to 365 days. Taking into consideration that Feature Updates are released every seven months, this should be sufficient. But keep in mind, a Feature Update is only supported for 18 months, so eventually, you will need to move to a release to maintain support. So, if you block 1703, for example, you will need to move to 1809 when the time comes.
Summing Up
Being able to block Feature Updates temporarily or indefinitely works today. But the way Microsoft handles Feature Updates story is not written in stone—the Windows as a Service (WaaS) model means that doing things is always subject to change. Users are pretty much between a rock and a hard place for the time being. We don’t recommend blocking feature updates indefinitely since they have become a critical part of Windows 10’s security mechanisms. As new releases are delivered, it’s truly an unknown in the future for older hardware. I guess when we arrive at that bridge, we will have to figure how to cross it. Let us know if you found this helpful. What are your thoughts on Feature Updates so far; are they more trouble than you asked for, or are they working just fine? Not the best way to go about it but at least this way I don’t get surprised with a new edition of Windows 10. There is a batch file that will enable/disable Windows update service with a click of the button – just google it. https://www.groovypost.com/howto/manually-install-standalone-cumulative-updates-virus-definitions-windows-10/ I’ve just spent two full days trying to sort out an installation issue on an HP Pavilion laptop further to an obvious internal conflict linked to a possible compatibility issue with the OS. It ended up in going back to a W10-1511 level ! No doubt that further to your publication, I will have a thorough look at all what will hapen next on that laptop prior to decide what to do for improving its stability. Jean-Michel https://www.groovypost.com/howto/download-iso-older-versions-windows-10-iso-files/ Update hiding resolved my issues, at least for now. Thanks for the tips! I deferred Windows upgrades with gpedit.msc and set the number of days 180 (the new maximum) in Select when Feature Updates, and activated it. But Windows is still trying to download an upgrade: Your device needs the latest security updates… and it fails every time to install it. Regards After all, the only ‘valuable’ stuff on your computer are documents and emails which you spent time on – if these are ‘lost’ there is a cost to recover this data. So – for the past number of years I have: a) Done regular, automated backups (the backup drive is ‘hidden’ from Windows when not being used to backup dStartup b) Completely disabled Windows updates
- Press Windows Key +R
- Type MSCONFIG and click OK
- Select Boot menu
- Check Safe Mode & click OK
- Restart
- In Safe Mode :
- Windows Key + R
- Type REGDIT and click OK
- Navigate to HKey_Local_Machine
- Select System
- Select CurrentControlSet
- Select Services
- Find the following 3 Services – windefend – wscsvc – wuauserv 13b. If under Services you see one called SecurityHealthService set this to 4 as well
- In the right hand panel of each service change the Startup value to ‘4’
- Right-click on each service, select Permissions and set the permissions for all users to ‘deny’
- Exit Registry Editor
- Run MSCONFIG again
- Change Boot startup to Normal (Unchecked Safe Mode)
- Reboot & please ignore Security Service error messages c) Uninstalled Windows Update Assistant d) Right-click on the C:\Windows10Upgrade folder, select Properties, then Security and change the access permissions for all users to ‘deny’ e) Disable all triggers for Windows Update\Orchestrator in Task Scheduler f) Employed a trusted antivirus + antimalware solution Once a year I format\reload the latest version of Windows. This not only speeds up the computer but the 2 hours this takes is nothing compared to the many hours lost to updates\broken updates\update rollbacks\post update fixes that are now the norm with Windows10. Comment Name * Email *
Δ Save my name and email and send me emails as new comments are made to this post.


![]()
