On Windows, these files are usually compressed as zip files. Linux uses a similar algorithm, called gzip. If you want to interact with these files, you’ll need to know how to extract a GZ file in Linux—here’s how.
Gzip vs GZ: What’s the Difference?
Gzip is the compression algorithm, reducing the file size while still keeping the original file mode, ownership, and time stamps. A file compressed using the gzip algorithm will usually end in the file extension .gz or sometimes just .z. Jean-loup Gailly and Mark Adler developed gzip for the GNU project as a replacement for compress. Unisys and IBM patents covered the LZW algorithm compress used. This made including compress in any GNU offshoots impossible. As luck would have it, gzip uses a superior compression algorithm compared to compress. Gzip is widely used not just in Linux, but also in many open-source software projects. You’ll even find the software in macOS,
How to Extract a GZ File in Linux
Extracting a file compressed using gzip is easy. Just issue this command from the terminal: This decompressed the file to its original state and removes the .gz file. If you want to keep the compressed file, just add the option -k to the command: The command gunzip is also available on most systems, as an alias to gzip -d. This means decompressing a file doesn’t require the -d option if you use gunzip: Once again, this will unzip the archive and delete the compressed file. If you want to keep the compressed version of the file, you again add -k to the command:
How to Extract a tar.gz File
It’s important to note, the gzip algorithm is designed to compress a single file. If you need to bundle multiple files together, or an entire directory structure, you’ll use both tar and gz. Let’s look at extracting a tar.gz file. In this case, we won’t use gz. Instead, we use tar, a holdover from tape archive days (hence the name) that’s still very useful today. To extract a tar.gz file, we use this command: The command automatically determines what sort of compression was used, and extracts the archive into the current working directory.
Creating Your Own Archives and GZ Files
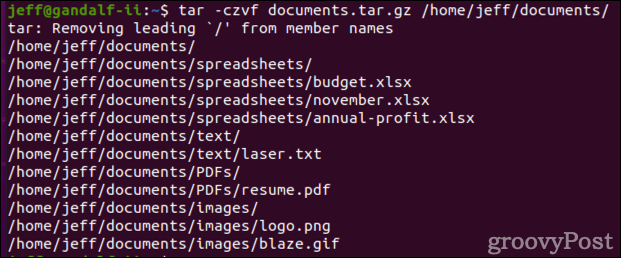
Knowing how to extract .gz and tar.gz files might be the most important task you need. However, it’s also important to know how to create these archives and/or compressed files in the first place. If you need to compress a file, once again use the command gzip, but without any options other than the file you want to compress. That command will compress annual-profit.xlsx. The original file is deleted, leaving only the compressed version annual-profit.xlsx.gz. If you want to keep the original in place, add the -k option. Now, let’s say we want to make a compressed archive of our documents directory, which has a number of subdirectories. We want to preserve the directory structure, bundle it all into one archive, then compress it. Just issue this command from the terminal: Lots of options there, so let’s look at what each one does.
-c: Create an archive-z: Compress the archive using gzip.-v: Display the progress while creating the archive. This is known as verbose mode.-f: Specify the filename of the archive.
One of the great aspects of tar is you can include multiple directories in the archive. If we want to backup our documents, downloads, and pictures directories in a single archive, we just issue this command:
Compressing and Decompressing Files Using the GUI
If you would rather not work in the terminal, graphical desktop environments have what you need. In Gnome’s Files application, just right-click the file you want to zip and click Compress.
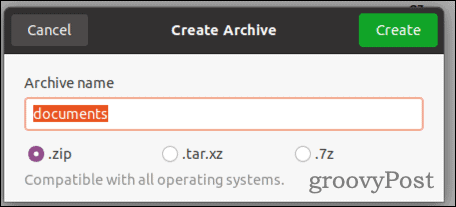
If you want to archive and compress multiple directories and/or files, control-click the ones you need to back up, then right-click and choose Compress.
The file manager asks what format you want to use. If you choose .zip, the compressed file will be easy to open on any operating system. You can also choose .tar.xz or .7z, but these will require the right software on Windows or Mac computers. If there’s a compressed file you need to open, once again right-click that archive in Files. You’ll see a number of options, including Open With Archive Manager, Extract Here, and Extract to.
The archive manager gives you more options, but most of the time you’ll want to use Extract Here or Extract to.
Working With Files and Other Admin Tasks on Linux
If you want to work with gzip files, the steps above should help you to compress and decompress them on a Linux PC. There are other important tasks you’ll need to learn if you want to become a Linux pro, however. Be sure to check out our guide on searching for files in Linux, as well as how to change your password. Comment Name * Email *
Δ Save my name and email and send me emails as new comments are made to this post.


![]()
