But what do you do if you have a mix of operating system platforms in your home? One of the challenges of a heterogeneous environment consisting of macOS, Windows, and perhaps Linux machines is that each operating system uses a different file system. This means that normally, they can’t share a common external hard drive. True, you could buy two 1 TB hard drives instead of one 2 TB hard drive. But it’ll be much more convenient to have one hard drive to rule them all, particularly if you plan on connecting your hard drive to your network. There is a relatively simple solution to this, though it takes a little prep work before you start using your hard drive. In this article, I will show you how to set up a hard drive so it can be used by both Windows 10 and macOS by creating separate partitions for each OS. If you happen to have Linux in the mix, you can add it in, too, with little effort. Editor’s note: Whenever you partition or format a hard drive, it wipes the data on the disk completely clean. Some utilities can shrink or split partitions without removing your data, but even those carry a risk of losing your data or corrupting your drive. Always back up your data before repartitioning or formatting a disk. Better yet, do the steps in this tutorial before you write anything important to the disk.
Backup Windows 10 or macOS (or Linux) Using a Single External Hard Disk
So, what are we going to do exactly? The process involves splitting up a single external hard disk into multiple partitions to backup different operating systems. Windows 10 uses the NTFS (New Technology File System), while macOS uses HFS+ (Hierarchical File System). Both feature similar attributes such as journaling, permissions, encryption, and a host of standard functions, but they are incompatible with each other. Apple is currently working on a next-generation file system to replace HFS+ with called APFS (Apple File System). APFS will support not only the macOS but also future revisions of iOS, watchOS, and tvOS.
Prepping a macOS Partition Using Windows Disk Management
The best way to prep an external hard disk for use on both Windows and macOS is to perform the partitioning from within Windows 10. Before you begin, you want first to determine how much space you will allocate for each operating system. This will depend on the amount of installed storage in each machine. Because I own more Windows PCs than Mac, Windows will end up getting the lion’s share of the external hard disk. Certainly, for the Mac, you want to at least double the amount of space depending on the amount of local storage. So, if the Mac has 256 GBs of space, you should double the backup space to 512 GBs. Because all the Windows PCs use the same file system, they can share a large single partition for standard backups and system images. At this point, you can proceed to the next section to format your Mac Backup partition. But it’s a good idea to also create a third partition on your disk that both macOS and Windows 10 can use. This makes it easy to share files between the two operating systems. Plus, this third partition will be readable and writable for Linux.
Create an exFAT Partition to Share Files Between macOS and Windows 10
To create our shared partition, we will shrink the Mac Backup partition; this time, we will use a unique file system compatible with Windows 10 and macOS, called exFAT. We previously covered using exFAT for sharing a USB stick between Windows 10 and macOS. exFAT is similar to the FAT32 file system previously used in older operating systems like Windows 98 and XP, but exFAT can support disks with up to 16 exabytes, which is more than the 32 GB limit for FAT32.
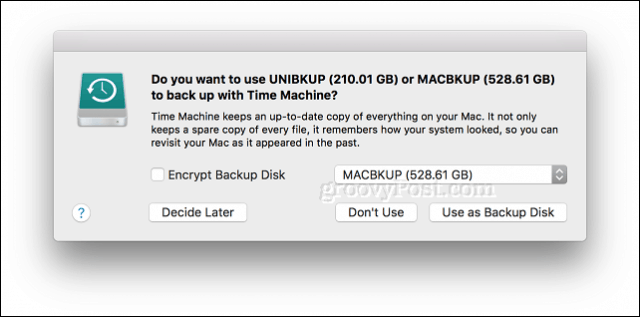
Initialize Mac Backup Partition Using Disk Utility in macOS
So, we have completed the first steps for sharing an external hard disk between multiple operating systems. Next, we will head over to the Mac, where we will need to prepare the Mac portion of the external hard disk for use with the macOS. And there you have it: you’ve taken your one big hard drive and made it into three separate volumes that can be used by Windows, macOS, or Linux as needed. Partitioning your drive as described above is just the first step to a solid backup plan. Remember to check out our series of articles about backing up your data. If you need more details about how to use Mac’s built-in Time Machine, be sure to check out our article. If you need advanced options for partitioning, you might want to check out our review of Easeus Partition Manager Professional. Are you using a mix of desktop operating system environments at home? Do you have a clever setup for your backup hard drive? Let us know in the comments! I do not have different systems at my home, but I would like to make a partition on C drive to save back up on the same hard drive. Win 10 continues to ask to save back ups and I do have one on external drive, but I do not want to keep it connected to PC all the time. So is it possible temporary save backups on the C drive? Regards Michael I am backing up my 2 PC with WIN 10 by periodically updating Windows Image. I am doing this on external 500 GB drive. Windows are creating on external hard drive folder with the name WindowsImageBackup. After creating the Image, I am changing the name of the folder adding at the end my name. Now External hard drive is ready to make Back up Image for the PC of my wife etc. Since size of the Image is not exceed 120 GB, I also have space for some additional files or even for the image of the 3rd PC. Since I never had a chance to use this Image, I am not sure If I am doing something wrong?. I would like to have your opinion on this issue. Many Thanks Regards, Bro Emma Comment Name * Email *
Δ Save my name and email and send me emails as new comments are made to this post.


![]()
